Release guide · Version 1.4.0
The July 2026 release, end to end
This release turns the app from a one-person tool into something a whole company runs on. You can put your people in it, group them into crews, put accepted work on a calendar, and see the hours a job actually took. Your crew opens the same app and sees only their stops, their checklist, and their clock. No prices anywhere on their side.
Read a section, then go do the thing. Every step below uses the exact words on the screen.
Start here
Three things that changed under you
Before anything else, here is what will look different the moment you open version 1.4.0, so nothing throws you.
- EST-0021 now reads JOB-0021. It is the same record with the same number. Only the prefix changed, because a record is an estimate and then a work order over its life, and one name had to cover both. Proposals you already sent keep the wording they were sent with, so a customer can be holding a paper that says EST-0018 while the app says JOB-0018. Same job.
- The floating clock pill that used to hover over the crew screens is gone on purpose. Active time now lives where the work is: on the job screen, on My Work, and on the Time tab.
- Crews are switched on for every organization. That puts a Field teams section on the People screen that was not there before, and it is the biggest thing in this release.
Which version you need
Everything here is version 1.4.0. On iPhone it arrives through TestFlight. To check what you are actually running, open the More tab and scroll to the bottom. The footer reads Version 1.4.0 plus the update it is running. If you are behind, tap More then Refresh app to pull the newest version without waiting for a restart.
Set up first
Crews and invites
Put your real people in the app, then group them into named crews with colors so work can be handed to a team instead of a person.
Crews used to be hidden. They are now on for every organization, including yours, so the Field teams section is visible to you today. Do this part first. Scheduling, the crew app, and job costing all depend on it.
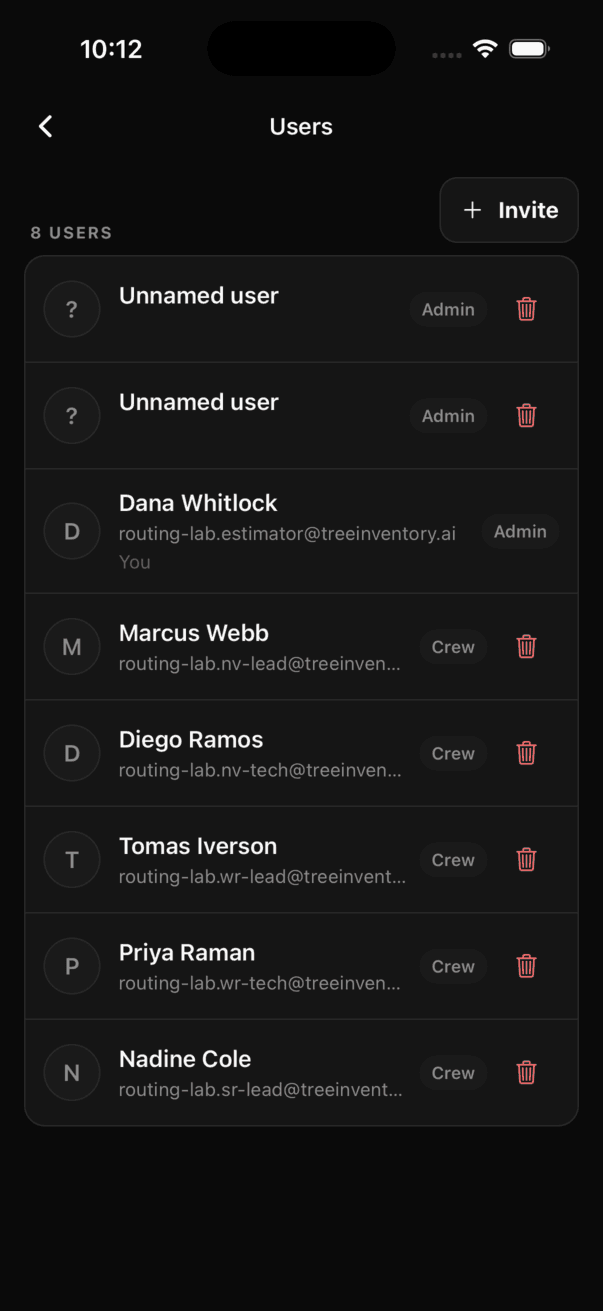
Invite someone as a crew member
- Tap More in the bottom tab bar.
- Tap People.
- Under Access, tap Users.
- Tap Invite.
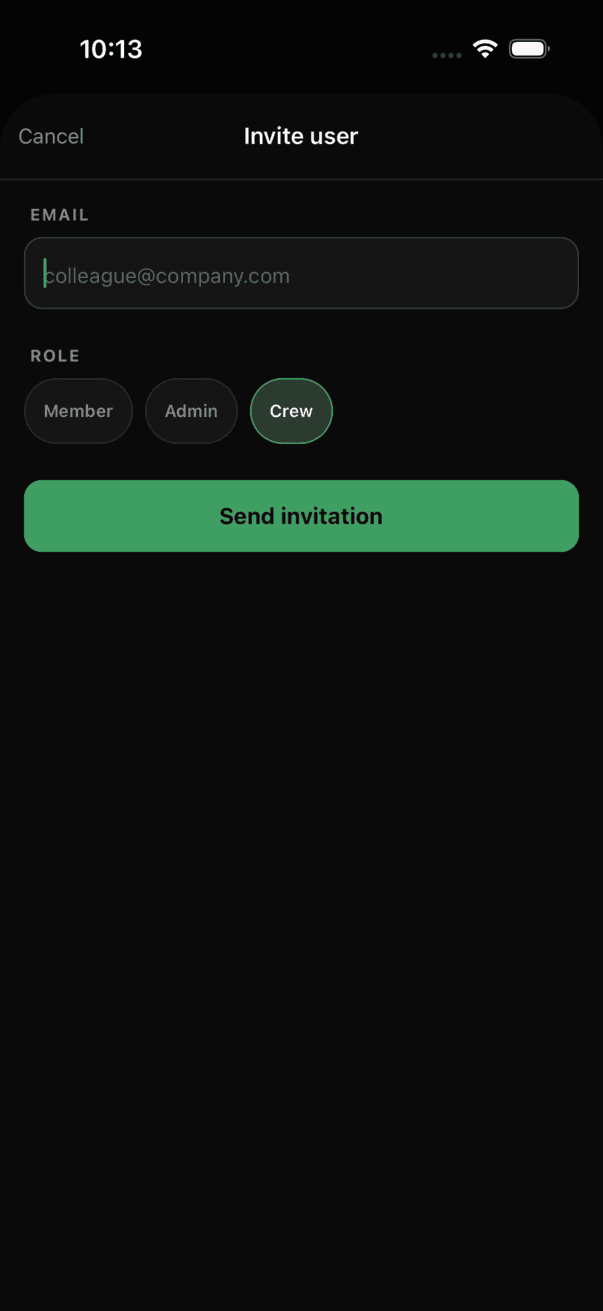
- Type their email, then tap the Crew chip in the ROLE row.
- Tap Send invitation.
They accept from their email like any other member. The first time they sign in they land straight in the field app, not your app. They never get promoted to anything else by accident.
To change someone who is already in, tap their row and use Change role. The same menu holds Remove user, and pending invitations can be canceled from the Pending invitations section.
Worth knowing
There are three roles. Admin can do everything including inviting people, merging customers, and correcting time. Member is your office and estimator side. Crew is the field app only, with no pricing anywhere.
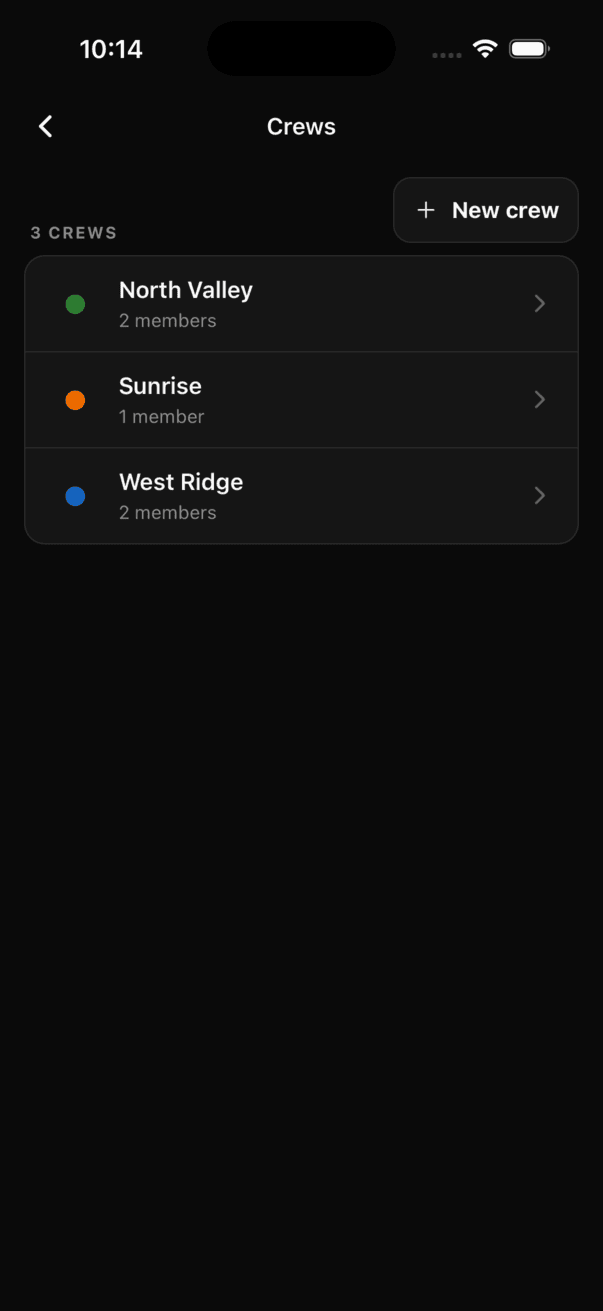
Create a crew and staff it
- Tap More, then People.
- Under Field teams, tap Crews.
- Tap New crew.
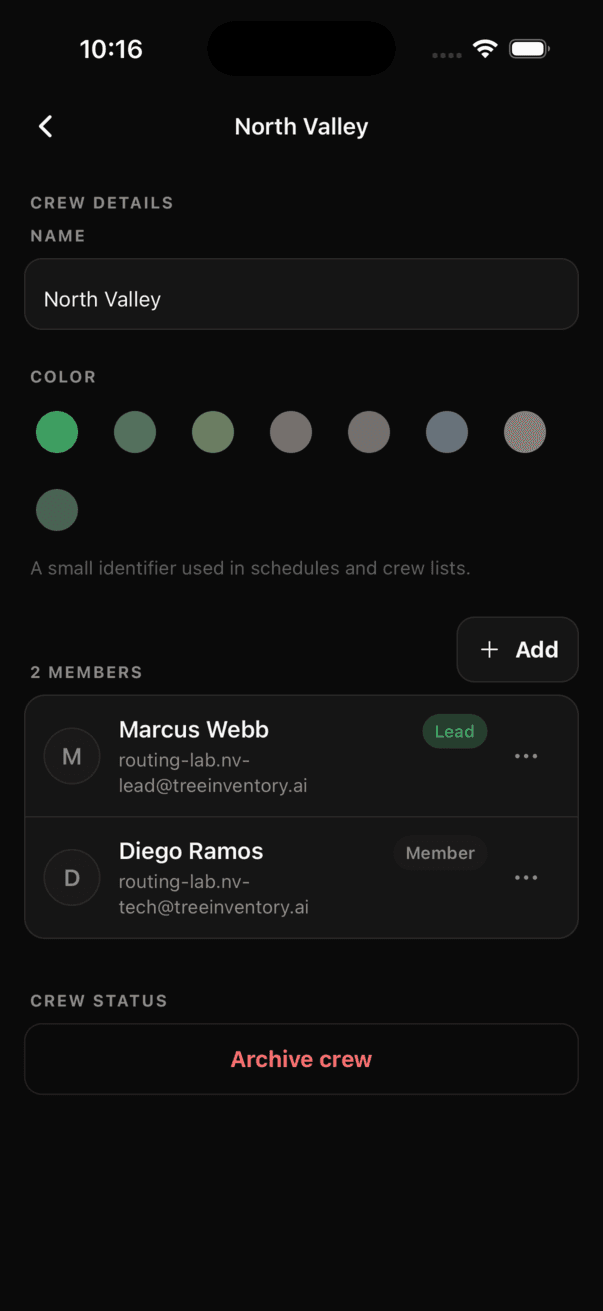
- Give it a Name and pick a COLOR, then save.
- Tap the crew you just made to open it.
- Tap Add next to the member count and pick people from your organization.
- Tap any member to get Set lead or Remove from crew.
The name saves as soon as you tap away from it. The color is what you will recognize on the schedule and on route pins, so pick something you can tell apart at a glance.
Worth knowing
One person can be on more than one crew. That is normal and the app handles it.
To retire a crew, open it and use Archive crew. Archiving takes it out of the active list and out of the schedule picker but keeps all of its history. Nothing is deleted.
Let a crew lead run their own roster
Whoever you mark as Lead can add and remove people on that crew from their own phone, so you are not the bottleneck when somebody calls out. In the field app they open More, tap their crew under MY CREWS, and get an Add button plus a ⋯ on each teammate offering Make lead and Remove. Handing off the lead is immediate, and their manage buttons disappear the second they do it.
Every crew member can see the roster and who the lead is. Emails are never shown in the field app.
Worth knowing
A lead cannot invite new people into your organization. Seats stay with you and your admins. A lead also cannot create, rename, recolor, or archive a crew.
Roster changes need a signal. Offline the app says Needs a connection. Try again. rather than pretending it worked.
See exactly what your crew sees
- Tap More, then People.
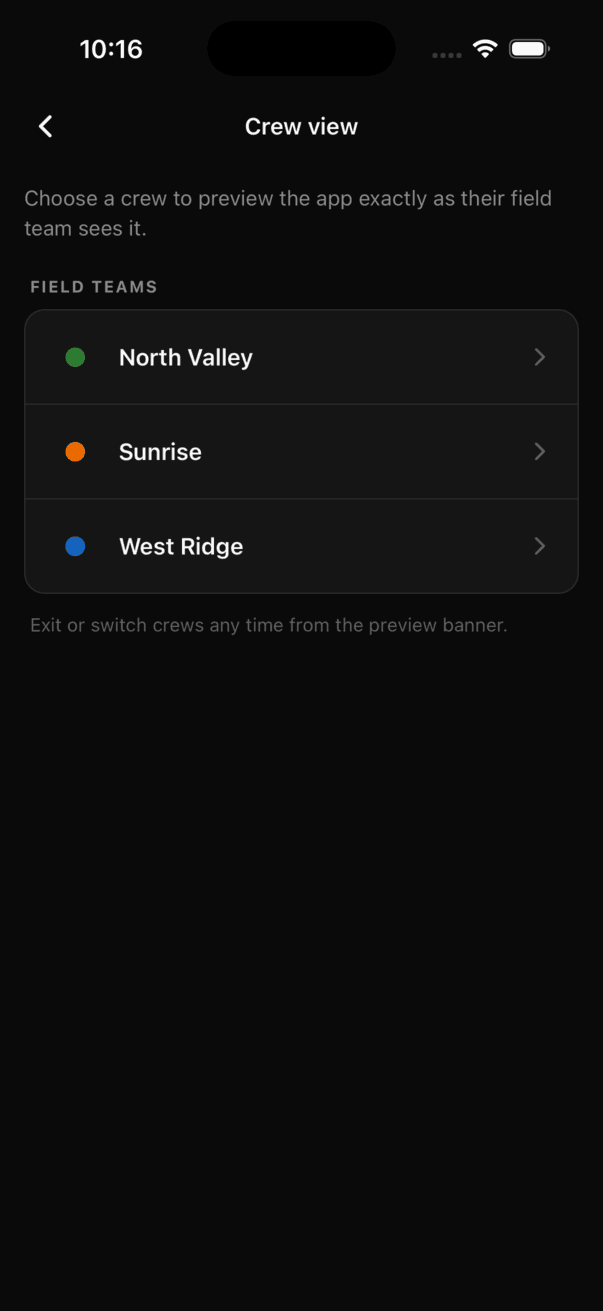
- Under Field teams, tap Crew view.
- Pick the crew. If you only have one active crew it goes straight in.
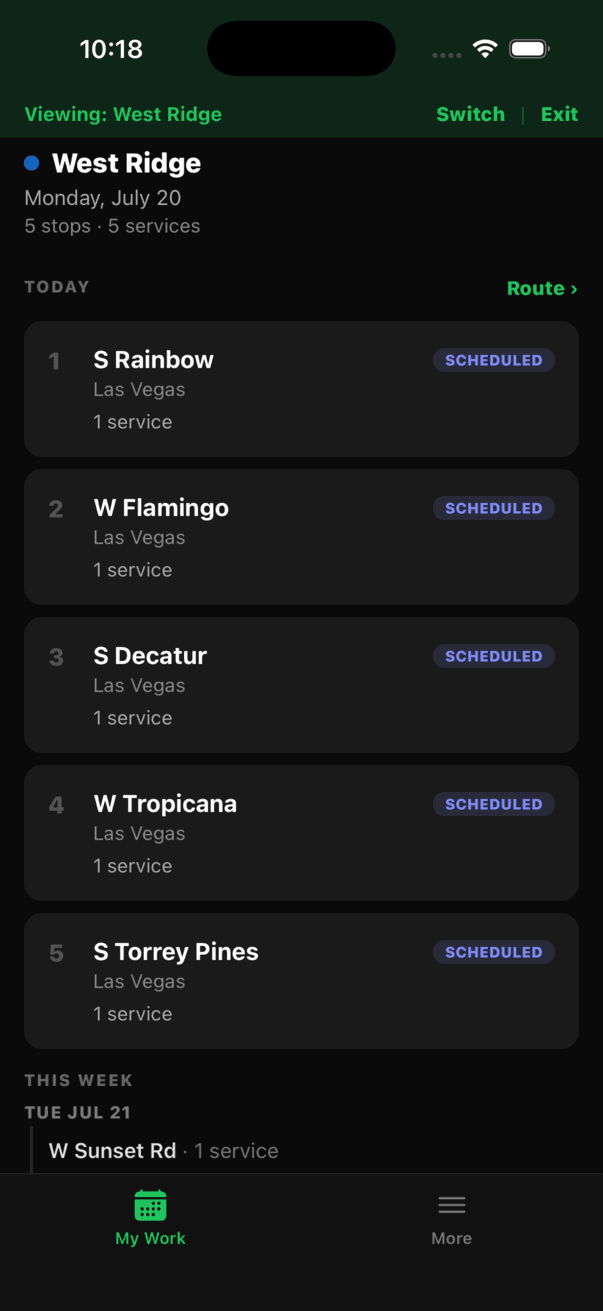
- A green banner reads Viewing: West Ridge with Switch and Exit. Everything below it is that crew's app.
- Tap Exit when you are done.
Use this to check that a day looks right before your crew rolls out, and to answer "what do I tap" over the phone without guessing.
Worth knowing
Preview is deliberately read only. Clock in shows as a disabled button with Preview only. Crew members can clock in here. That is not broken. A tap from your account would put your hours on their job.
Service check offs are inert for the same reason, and the Timetab is hidden because time is each person's own ledger. This is a preview of a crew's day, not a way to sign in as one of your people.
Daily use
The crew's day
Your crew opens the same app and sees only their work: today's stops, the service checklist, the trees at each site, the drive route, and a clock.
A crew member gets a three tab app: My Work, Time, and More. There is no Sites tab, no Jobs tab, no estimates, and no dollar figure anywhere. That is built into what the server sends them, not hidden in the layout, so prices cannot leak.
My Work, the tab they land on
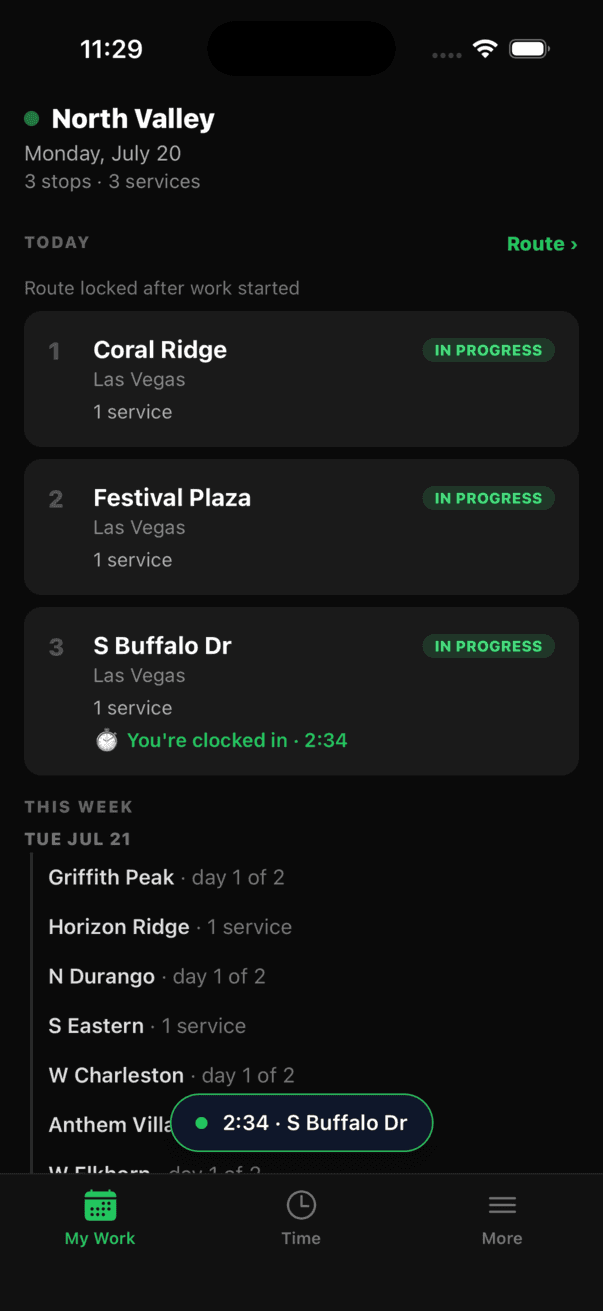
The top three lines are the crew name, the date, and the day in one line, like 3 stops · 3 services. Below that:
- TODAY, with a Route › link on the right whenever there is work today.
- THIS WEEK, with a date header for each upcoming day.
- Each card shows its stop number, the address, the city, and either 3 of 5 services done or the service count plus the day note.
- When someone is on the clock, their card adds You're clocked in with the running time.
If your crew works for more than one of your crews, they tap the crew name at the top to open My crews and switch, which shows how many jobs each crew has today.
The job screen
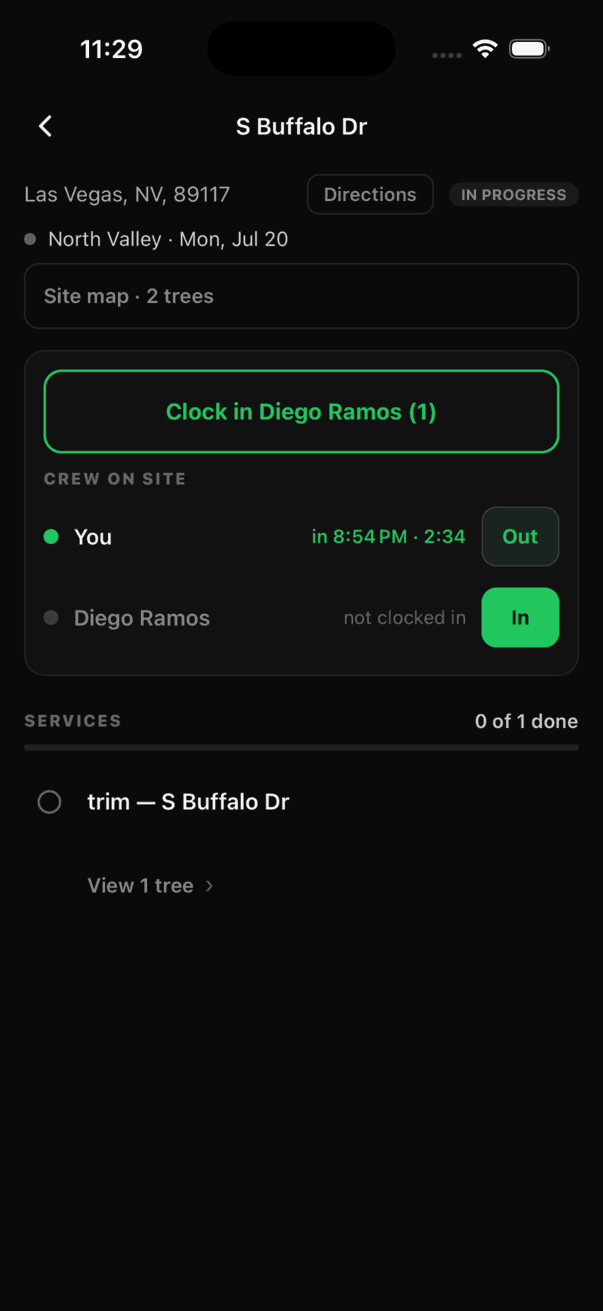
- From My Work, tap a stop.
- Tap Directions to hand the address to Apple Maps or Google Maps.
- Read the Job note: and Site note: lines. Gate codes, dogs, and access notes surface here.
- Tap Site map · 2 trees to see the property and its trees.
- Under SERVICES, tap a line to mark it done. The progress bar reads 0 of 1 done and climbs.
- Long press a line for Done, Skip, or Back to pending.
- Where a line covers specific trees, tap View 1 tree to open the actual trees with their photos.
Worth knowing
Checking off every line does not close the job. The crew sees All services done. The office closes out the job.Closing a work order stays with you. Ticking a line never moves the job's status.
Notes and photos are visible to the crew but read only in this release. There is no camera on their side yet.
The site map, by plant or by service
Tapping Site map opens the same property screen you use, read only, with the map, the tree pins, and the plant details, minus anything that edits, captures, prices, or deletes.
On the Trees tab the crew gets a switch you do not have:
- By plant gives one card per tree listing the services that tree needs, each marked To do, Done, or Skipped. This answers "what do I do at this tree."
- By servicegives one card per service listing every tree under it. This answers "how many of these am I doing today."
Route, the day as a map
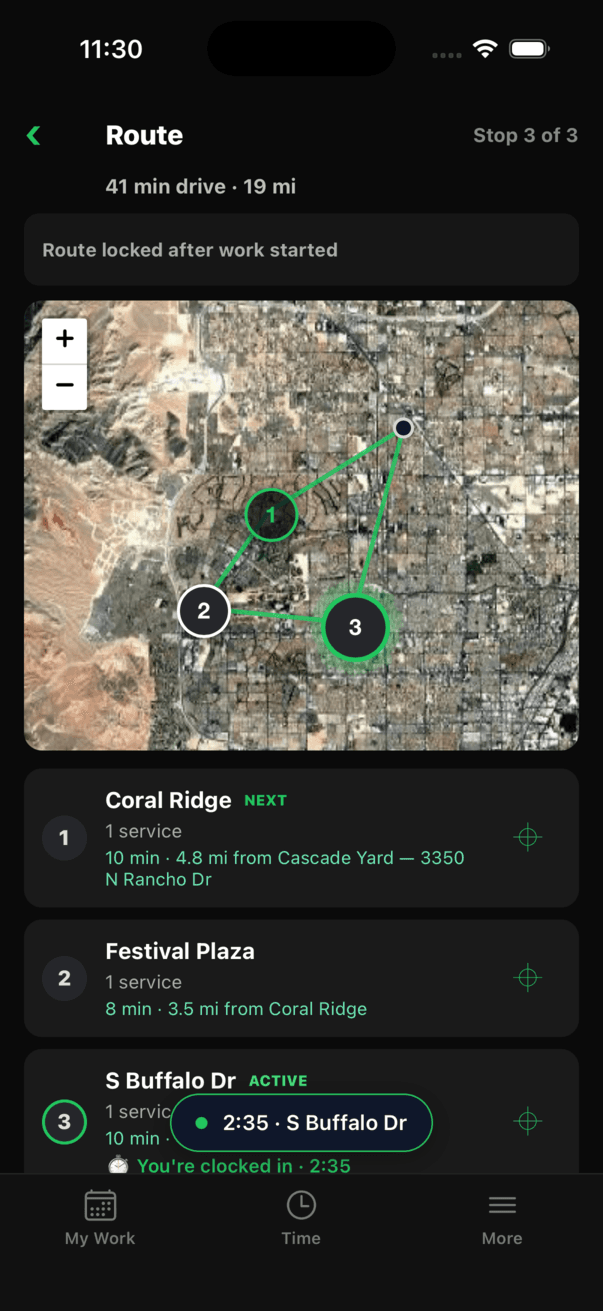
- From My Work, tap Route › on the TODAY header.
- The summary on the right reads Stop 3 of 3 while somebody is clocked into a stop, otherwise the stop count and how many are done.
- Numbered pins sit on the map in order. The stop they are clocked into is tagged ACTIVE, the one after it is NEXT, and finished stops carry a green check.
- Tap Directions on any card to navigate to it.
Worth knowing
The line between pins is drawn straight, not along roads. Real turn by turn is handed off to Apple Maps or Google Maps through Directions.
This screen is not live tracking. It shows the planned order plus each stop's status. There is no GPS tracking of crews in the product.
Offline the map disappears with The map needs a connection. Your stops still work below. and the stop list keeps working.
The crew's More tab
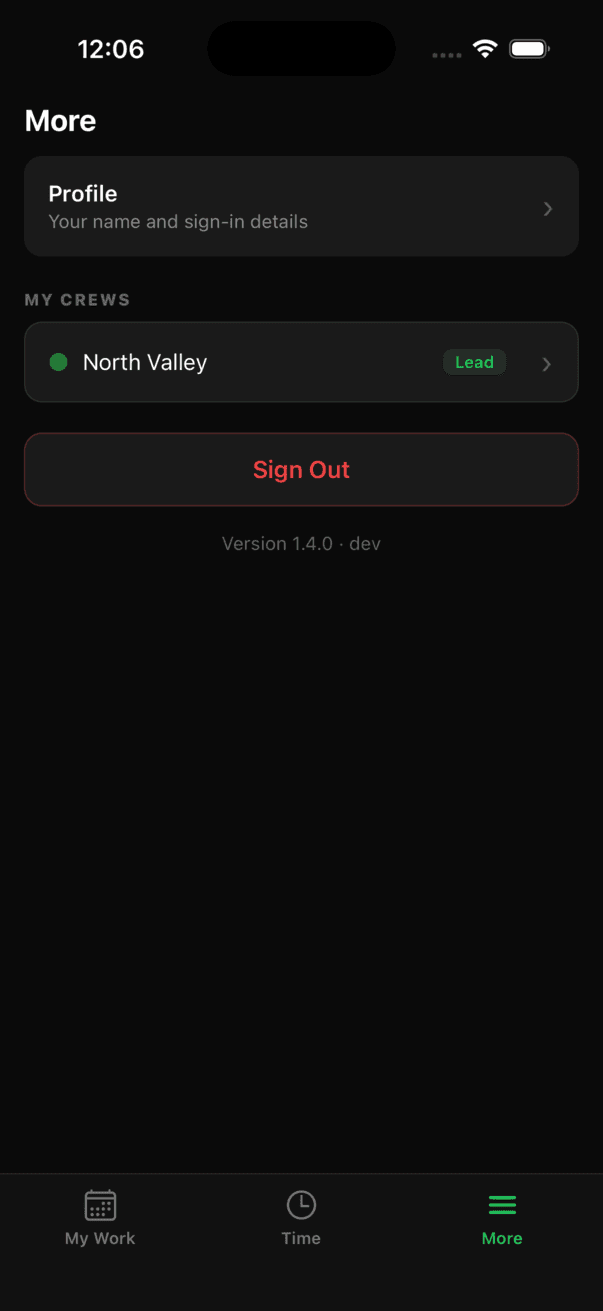
Profile holds their name and sign in details. MY CREWS lists the crews they belong to with a Lead badge where it applies, and tapping one opens the roster. The version footer at the bottom is the fastest way to confirm over the phone which build somebody is actually running.
If they are not on a crew yet it says so plainly: You're not on a crew yet. The office adds you.
Offline, in plain terms
A crew member has to open the app with a signal at least once for My Work to fill in. After that, reading their day keeps working offline off the last loaded copy, marked Offline · updated 6:12 AM.
Clocking in works offline and syncs later, shown with an amber dot until it does. Service check offs need a connection. If a clock action fails for good, the app says A clock action didn't sync. Open the job to fix it. instead of quietly losing it.
Daily use
Time tracking and job costing
Anyone on a job can clock in and out from their phone, one person can clock the whole truck in, and the job's Time tab tells you how many hours that job actually took.
Clocking in from the field
On the crew job screen there is one big green Clock in button. No confirmation, no dialog. Under it, CREW ON SITE lists everyone on the crew: a green dot, their name, their clock in time, their running total, and an Out button. People who are not clocked in show a grey dot, not clocked in, and an In button.
Anyone on the crew can clock anyone on the crew, so the guy driving can clock in the whole truck at the gate. The app records both whose hours they are and who pressed the button, which is why entries can read in by Marcus Webb.
Worth knowing
One person can only have one open entry at a time across your whole organization. Try to clock in somewhere else and the app says You're clocked in at S Buffalo Dr and offers a Go to job button.
Forgotten clock outs are never silently closed. After twelve hours the entry shows Still clocked in since yesterday. Tap to fix. Tapping it opens a sheet that asks When did work stop? with chips for the usual quitting times that day, Now, and Pick a time… Backdating a close needs a connection.
What the crew sees on their own time
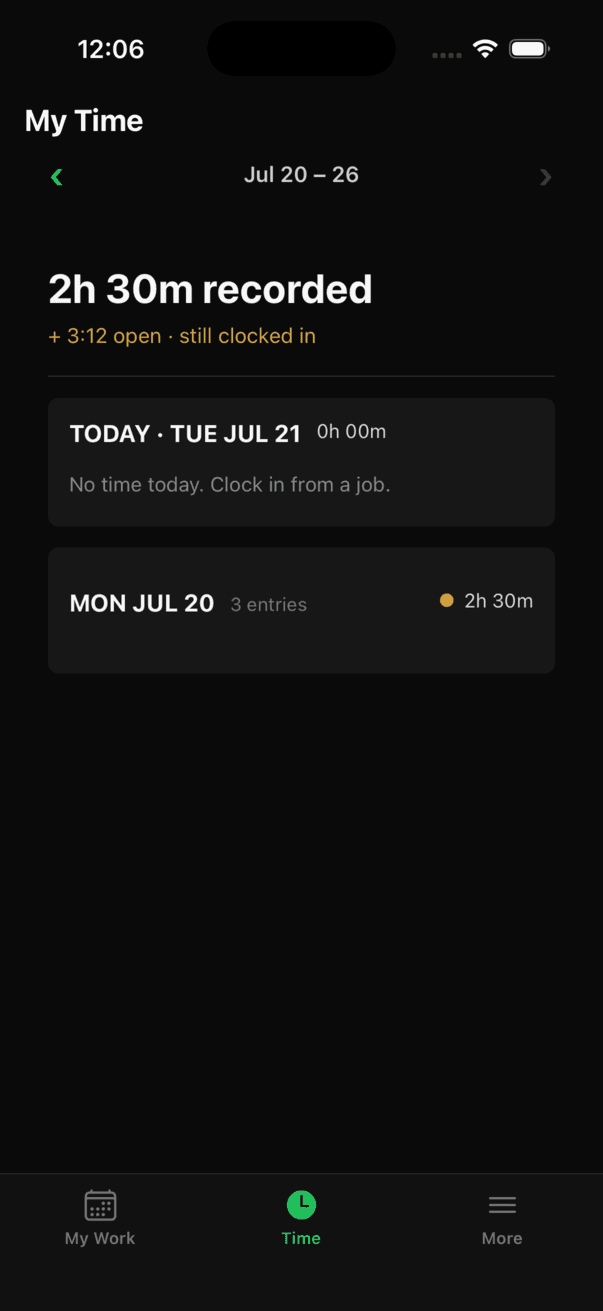
- In the field app, tap the Time tab.
- Move weeks with the ‹ and › chevrons. There is no swipe, on purpose, because of gloves.
- The big number is recorded time. Open time is kept separate as + 3:12 open · still clocked in so a running clock never inflates the total.
- Tap the running row to jump back to the job.
Rows here are read only. Crew members cannot edit their own hours.
Your Time tab on a job
- Tap Jobs, then open the job.
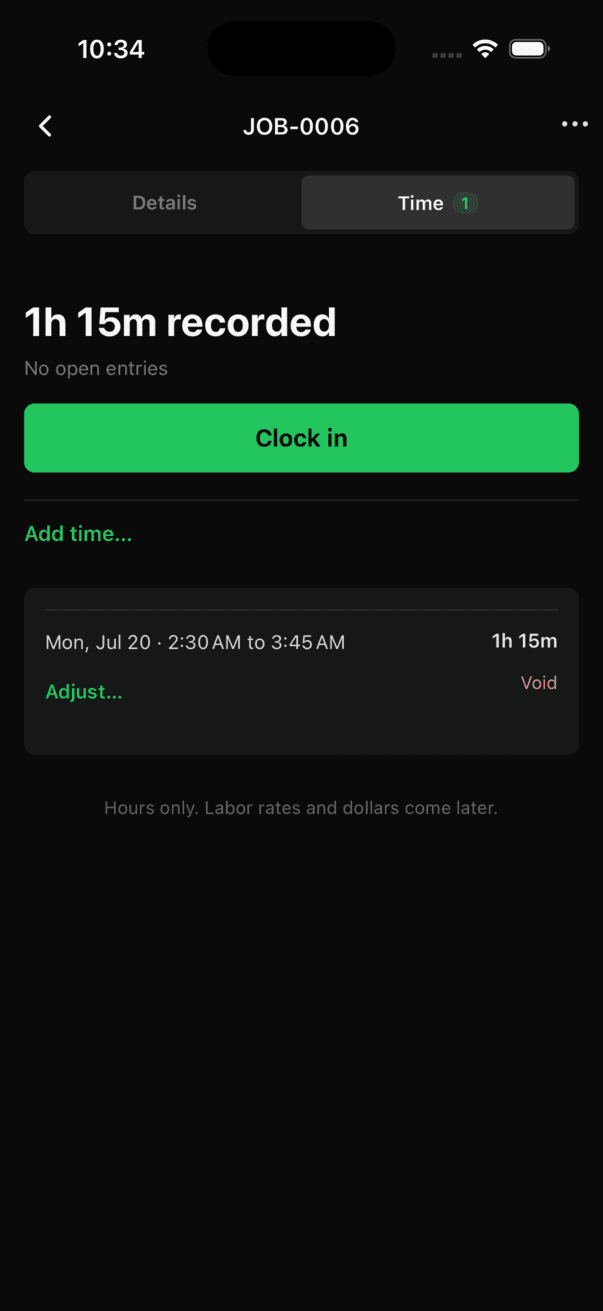
- Tap the Time segment next to Details. It appears once the job is accepted or later, or as soon as it has any entries, and carries a count badge.
- Read the recorded total at the top, like 1h 15m recorded. When someone is on the clock a second line adds the open time, like + 4h 27m open · 1 person still clocked in.
- On a job with two or more people, use the filter chips (Everyoneplus each name) to see one person's hours. The top numbers recompute to that person.
- Swinging a saw yourself? Tap Clock inright here. Your hours belong in the job the same as anyone else's.
Fixing time that is wrong
You and your admins can now correct hours. Everything is recorded, nothing is erased.
- Close entry… on an open entry, for somebody who forgot to clock out.
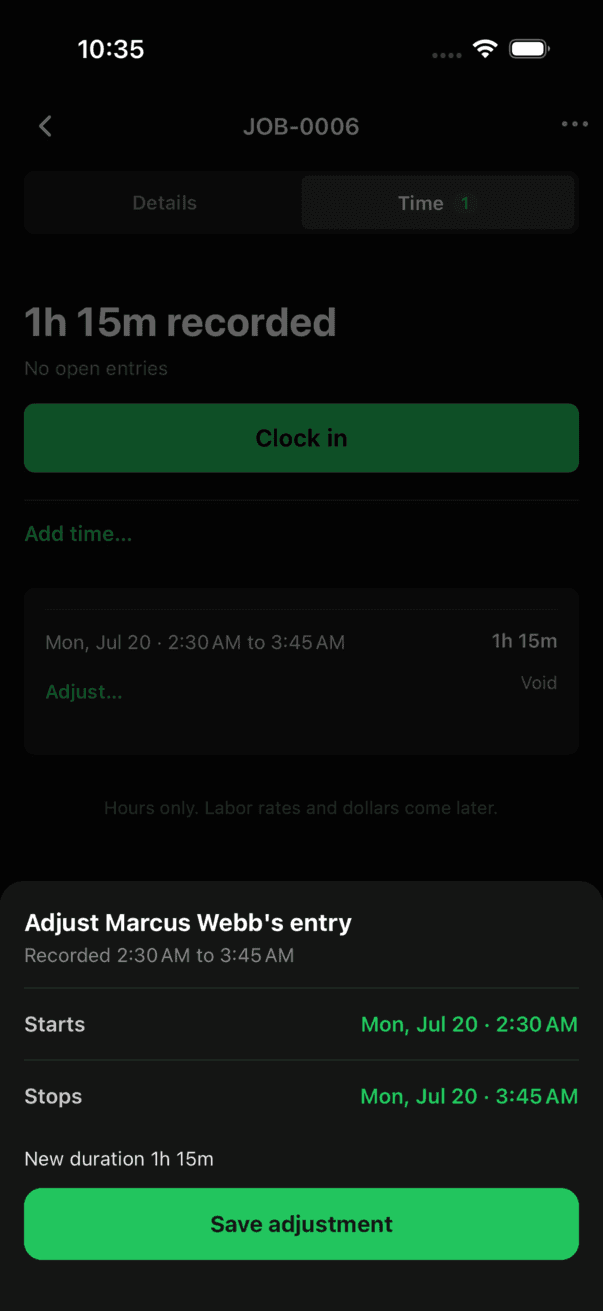
- Adjust… on a closed entry. It opens with the current times, gives you Starts and Stops pickers and a live New duration, and saves with Save adjustment. The original tap times are kept forever.
- Add time… above the ledger, for hours nobody clocked at all. It asks Who is the time for?, Day, Starts, and Stops, and it will not accept a time in the future.
- Void on any entry. It stays in the job history and stops counting toward recorded hours. Nothing is ever deleted.
Worth knowing
An adjusted entry is labeled. The row shows ADJUSTED and Was 2:15 AM to 3:45 AM, and that shows on the crew member's own Time screen too. Corrections are visible to the person whose hours they are, by design.
You cannot edit an open entry, so close it first. You cannot unvoid. Crew members and plain members cannot correct anything. Corrections all need a connection and are never queued offline.
Hours only, for now
Version 1.4.0 reports hours, not dollars. The footer says so: Hours only. Labor rates and dollars come later. There is also no across-jobs report per person yet. The per person filter lives inside one job.
Daily use
Scheduling
An accepted estimate goes onto a crew and one or more days in a few taps, and the Schedule screen shows the whole week, including what is sold but not yet on the calendar.
Put an accepted job on the calendar
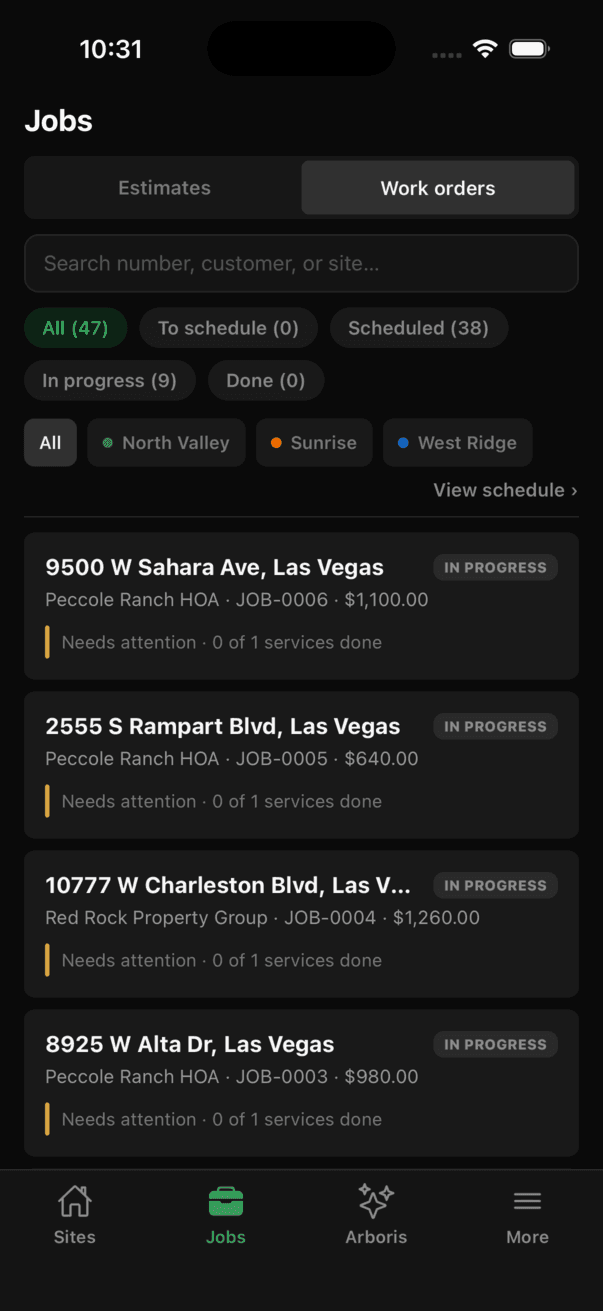
- Tap Jobs, then the Work orders side of the switch at the top.
- Tap the To schedule chip. That is everything sold and waiting on a date.
- Open a job and tap Schedule work.
- Pick a Crew chip. No crew yet is allowed if you do not know who is running it. Archived crews never appear here.
- Set Expected days with the stepper. This is a hint. It preselects that many business days from your first tap and never blocks you.
- Tap the days you want in the four week grid. Past days are disabled.
- Add a Note if the day needs one. The placeholder says it well: gate code, staging, anything the day needs.
- Confirm with Schedule North Valley · 3 days.
Scheduling moves the job from Accepted to Scheduled, and it now shows up in your crew's My Work.
Worth knowing
The day grid can show a small badge with how many jobs that crew already has, and a hint like North Valley · 2 jobs Thu. That is information, not a guard. The app will not stop you from overbooking a crew.
Scheduling is by the day, not by the hour. There is no time of day grid for production work.
Change the days on a job
Open the job and find Scheduled days. Each row shows the crew color, the date, the crew name (or No crew), and the note. + Add days sits on the right. The ⋯ on a day row gives you Bump a day, Edit, and Remove.
- Removing the last day asks first and returns the job to Accepted, so sold work always lands back in a visible backlog instead of disappearing.
- Adding a day that is already there is skipped quietly with Already scheduled. No duplicate is created.
- Adding days to a job that is already in progress keeps it in progress. It does not get knocked back a step.
The Schedule screen
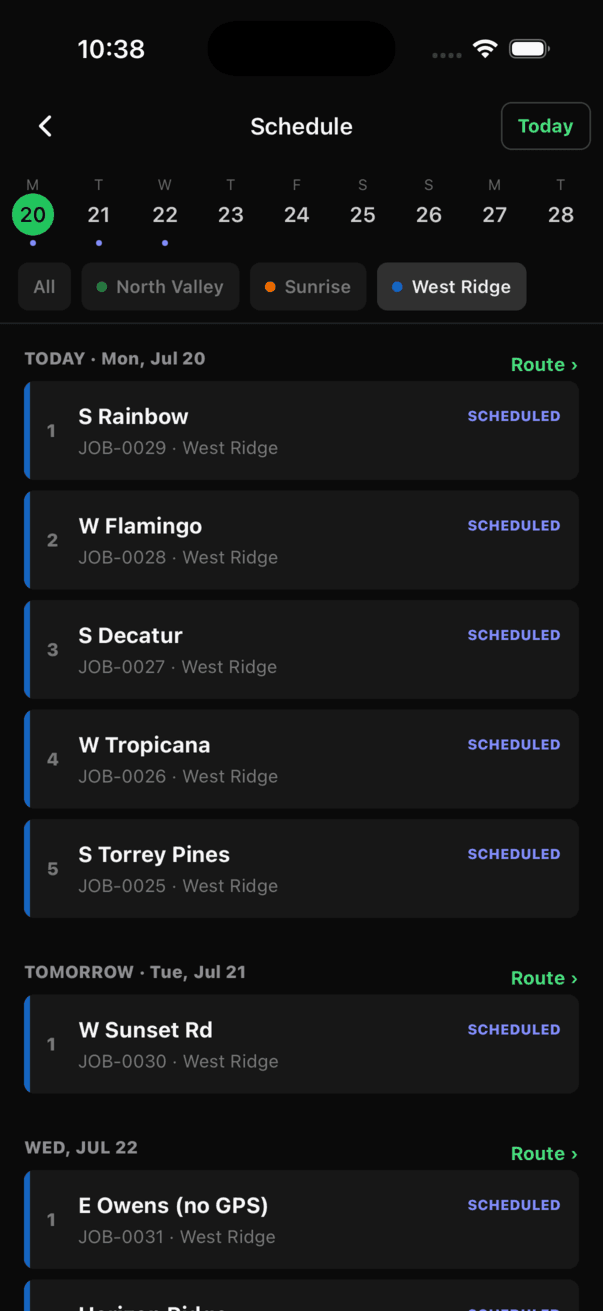
- Tap Jobs, then Work orders, then View schedule ›.
- Scrub the two week day strip at the top. Days with work carry a dot. Today in the header snaps you back.
- Filter by crew with the chips underneath when you have more than one crew.
- TO SCHEDULE (N) is your sold but undated backlog. Each card carries the job number, the amount, and how long it has been waiting. Tap Schedule work right on the card, or long press to open the job.
- NEEDS ATTENTION in amber is live work whose last scheduled day has already passed. Check it every morning.
- Below that, day groups read TODAY, TOMORROW, or the day name, with each stop numbered in order.
Look at one crew's day on a map
- On the Schedule screen, tap a specific crew chip. Not All.
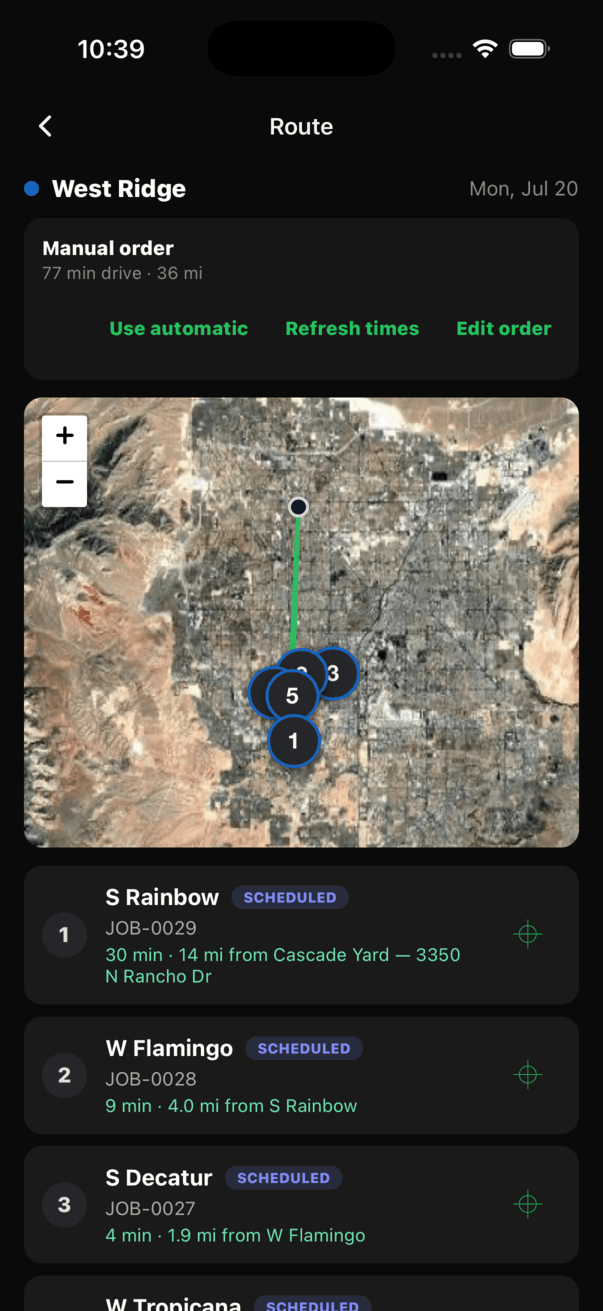
- Tap Route › on a day header. The link only appears once a single crew is selected.
- You get that crew's stops in planned order with each stop's status. A stop flips to in progress when somebody clocks in.
Same honesty as the crew route: this is the order the office set, not a live position feed. Nobody is being tracked.
Automatic routing is visible but not switched on yet
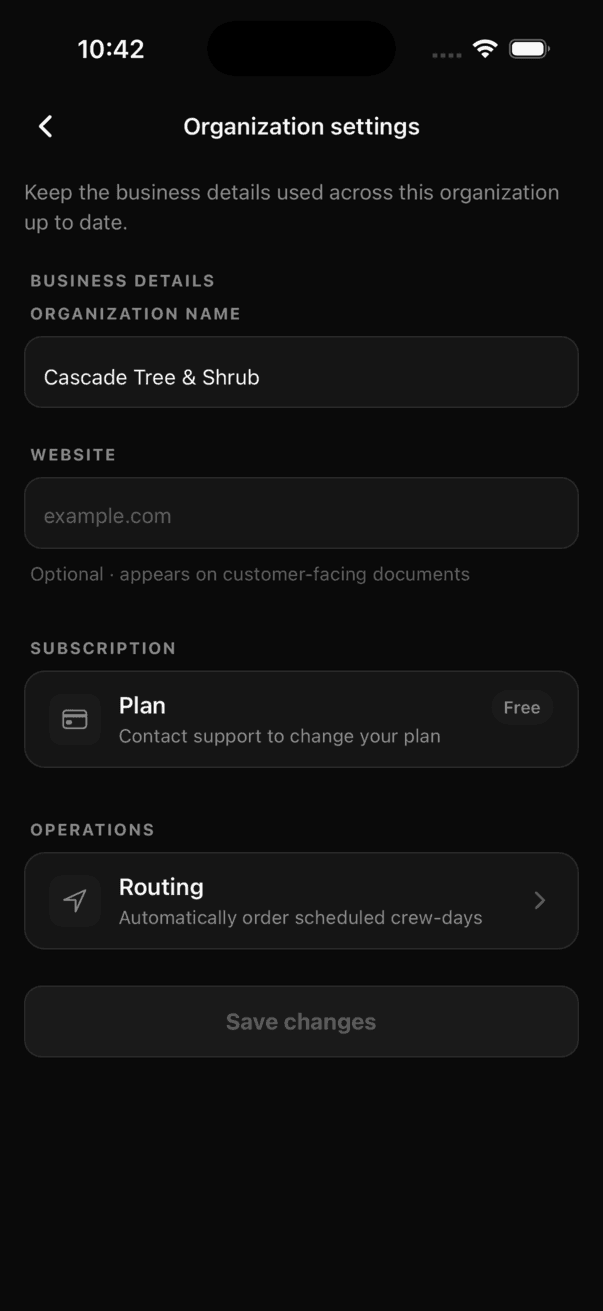
You will see routing controls in two places: a Routing row under Operations in organization settings, and a Manual order / Automatic route control with Optimize now and Edit order on the route screens.
Automatic ordering is not turned on in production yet, so those controls will not reorder anything today. Both route screens fall back to the order you saved on the schedule and say so: Saved schedule order shown. The stops, the pins, the statuses, and Directions all work normally. Order your day on the schedule and the route follows it.
Two gaps to plan around
There are no push notifications. If you move a job at 6 a.m., the crew sees it the next time they open the app. Tell them to pull My Work to refresh when plans change.
There is no crew capacity or availability model and no recurring service plans. The schedule holds what you put on it.
Office side
Estimating
Four ways to start an estimate depending on whether you have inventoried the property, plus the ability to put several of a customer's properties on one proposal.
Starting an estimate
- Tap Jobs, stay on the Estimates side, and tap + New estimate.
- Choose a property opens full screen with the search box above the results, so the keyboard no longer covers what you are typing. Every property is selectable now, including one with no trees yet.
- Pick the property. Four ways to build it appear.
- Draft with the Estimate Generator reads the analyzed trees at the site, matches your catalog, and explains every line before you send anything. It needs at least one analyzed tree at that site.
- Price by quantity is new. A service, a quantity, a price, no tree records needed.
- Build by species groups the property by species so you can price a big site fast.
- Tag tree by tree flips through every tree one at a time.
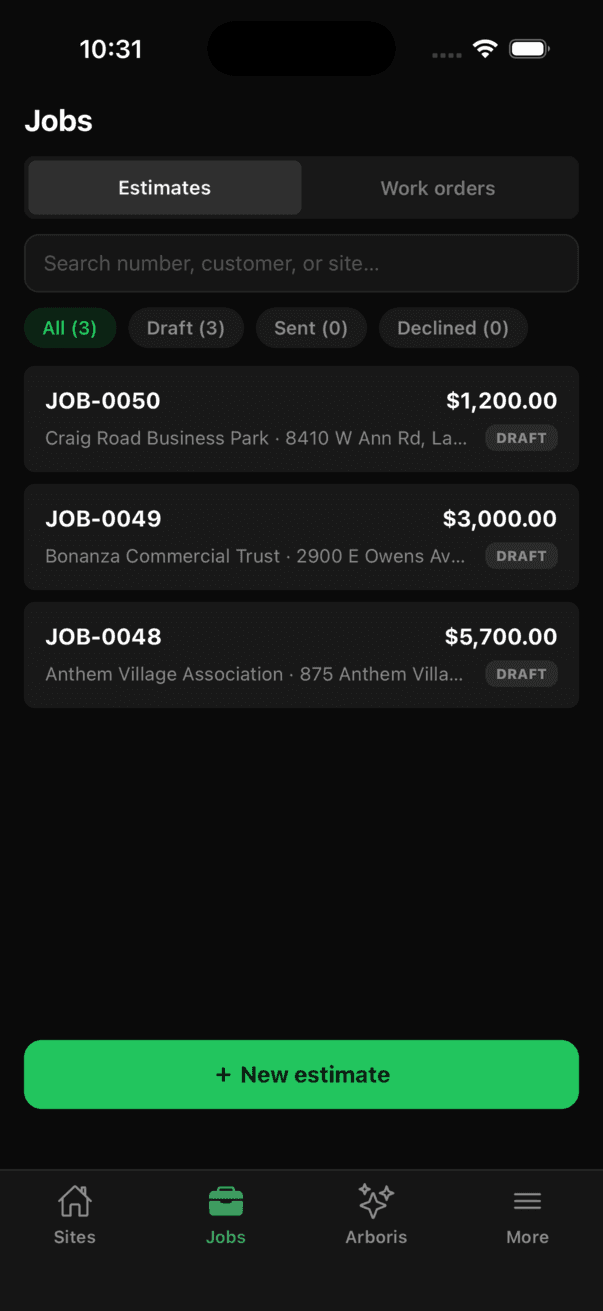
Price by quantity, the one you asked for
- Tap Jobs, then + New estimate, then pick the property.
- Tap Price by quantity.
- Pick a Service from your catalog. It shows the catalog price, and you can create a new service right there.
- Write the Description on estimate, the wording the customer reads.
- Enter Quantity and Price each. The line total and estimate total update as you type.
- Tap Create draft. You land on the normal estimate where you can add more lines.
No placeholder trees, no photos, no tree links get created. You still pick a property first, because a job belongs to an address.
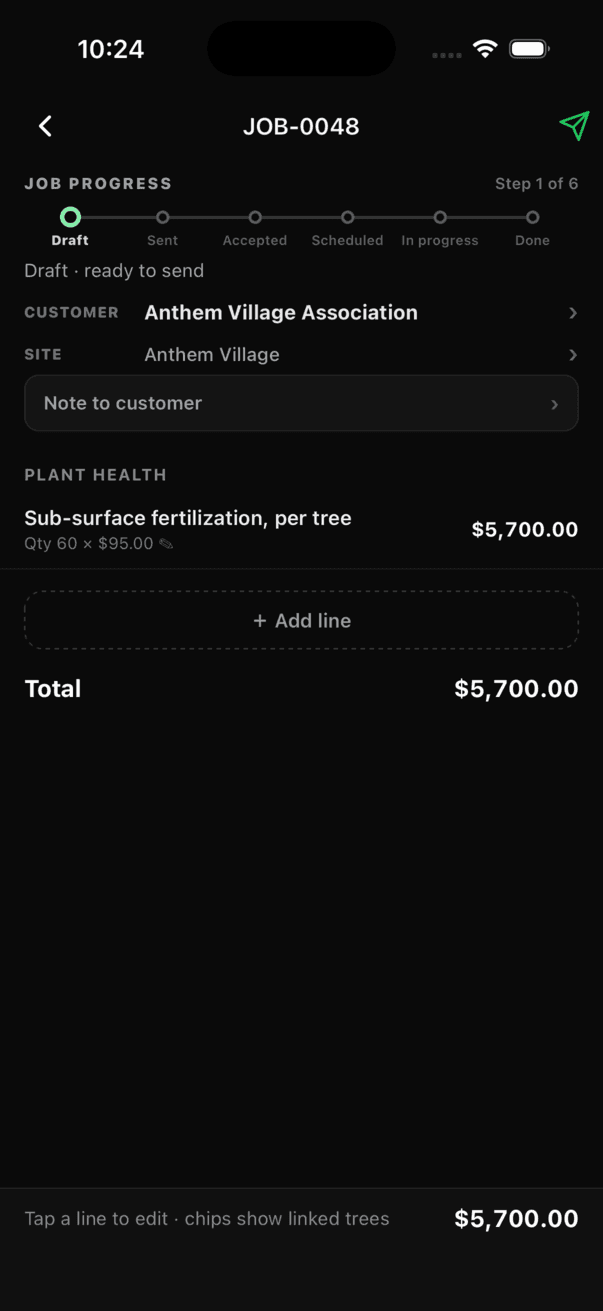
One proposal covering several of a customer's properties
You can price several of a customer's sites on one proposal, two different ways. The customer accepts the whole thing at once.
Priced site by site. While building with Build by species, a Site switcher appears above the canvas when the customer has more than one site. Tap it to move between properties. Once the draft exists, use + Add line then Another location, pick from Which location?, and the estimate then shows a section header and a subtotal for each site.
One day rate for all of it. In the confirm sheet when you add lines, set Pricing to Flat / day rate. The Covers field reads something like 40 trees · all 3 locations, and on the estimate that line sits under All locations with the note One day rate covering every location.
Worth knowing
An estimate is one or the other, never both. If you already committed a flat all sites line, adding per site lines is blocked with a message telling you to remove that line first.
All the sites have to belong to the same customer. Acceptance is all or nothing, there is no accepting one location. And you cannot move a line to a different site after the fact.
Anywhere a job covers more than one property, the label carries a + N sites suffix: job cards, the job's Site row, and schedule rows.
Smaller things you will notice
- Job cards and job details now show the customer's name, not just the address, and the Jobs search matches customer names, including a one character typo. Customer and Site are two separate rows so a long address cannot hide who the work is for.
- Price fields no longer trap you on iPhone. A green Done bar sits above the number pad on every price field.
- The estimate shows when it was sent, on both the list and the detail.
- More then Products & services is your catalog, grouped by category, with a default price per service. Existing estimates keep the descriptions and prices they were written with.
Office side
The job lifecycle
The Jobs tab has an Estimates side and a Work orders side, and every job shows exactly where it sits in a six step life from draft to done.
The six steps
Open any job and the top carries a JOB PROGRESS track reading Step 5 of 6 across Draft → Sent → Accepted → Scheduled → In progress → Done. Under it, one plain line says where it stands right now, like Draft · ready to send, Sent · 3 days ago, Accepted · waiting to be scheduled, or In progress · 0 of 1 done.
A job that ends badly replaces the track with a Declined or Canceled badge and the reason in quotes.
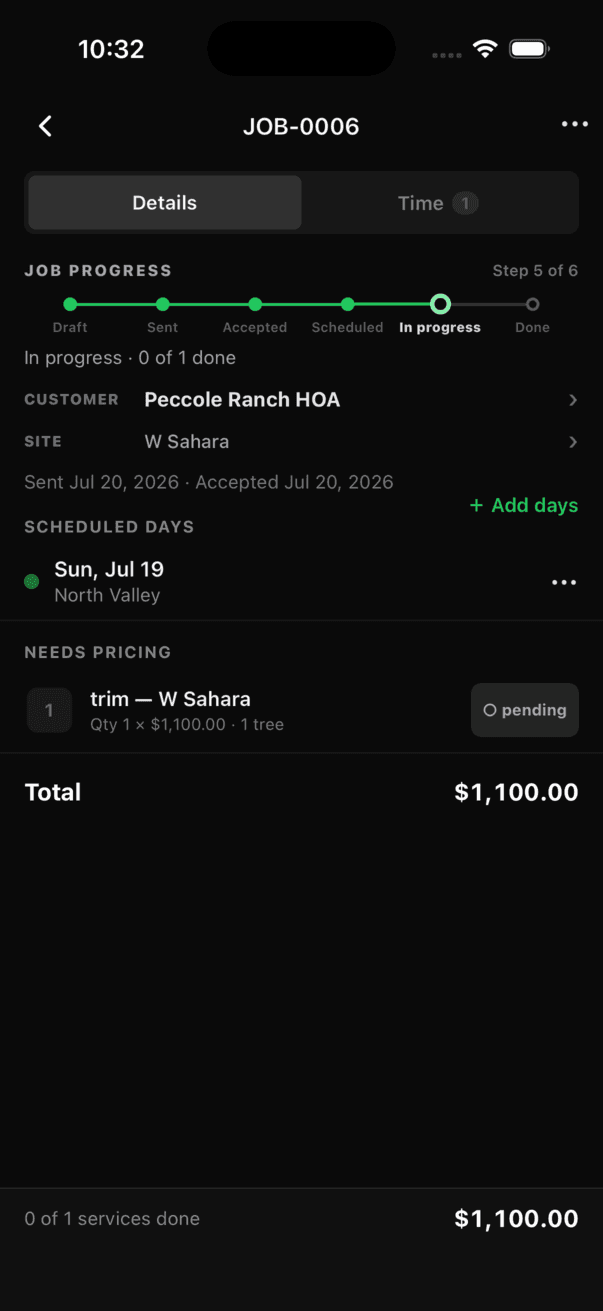
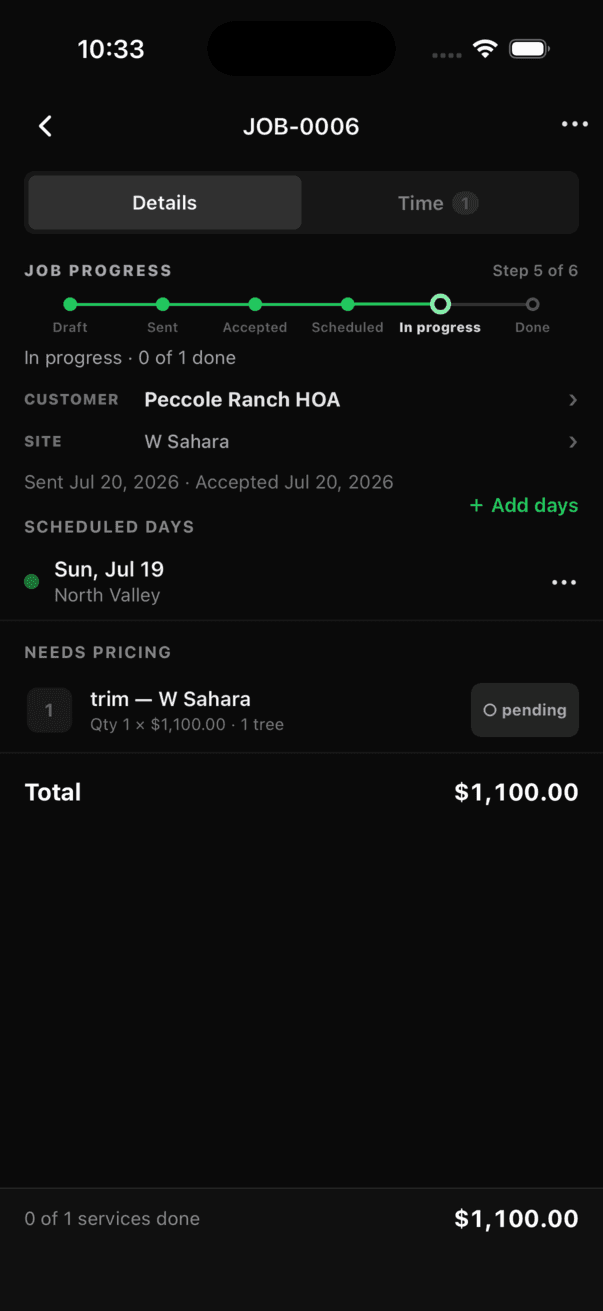
Working a job through
- A sent estimate gets Client accepted or Client declined from the ⋯ menu.
- An accepted job gets scheduled, which moves it to Scheduled.
- It moves to In progress when somebody clocks in. Not before.
- Service lines get ticked off in the field, or by you here. Each line is pending, done, or skipped. Tap to toggle, long press for Service status.
- Once every line is done, ✓ Complete job appears in the footer. Confirm with Complete work.
- Changed your mind? ⋯ then Reopen job puts it back to in progress.
The ⋯ menu also carries View PDF and Copy to new draft on anything past draft, and Cancel job in red.
Worth knowing
Ticking off lines never changes the job's status. Completing a job is always a deliberate act by you, not something the crew triggers by finishing.
Cancel is permanent and takes a reason. The scheduled days stay on the record as history and the work leaves the crew's upcoming list.
Clocking in is blocked on completed and canceled jobs, but clocking out always works, so nobody gets stuck with an open entry on a job that closed around them.
About JOB-0021
Every identifier reads JOB-#### now. The stored numbers, the links you have already shared, and the customer facing tokens did not change. If a customer is holding a proposal that says EST-0018, it is this job.
Everywhere
The app and your settings
The menus were reorganized so organization, people, business, and account settings each have their own door, and you can pull the newest version yourself.
The tabs
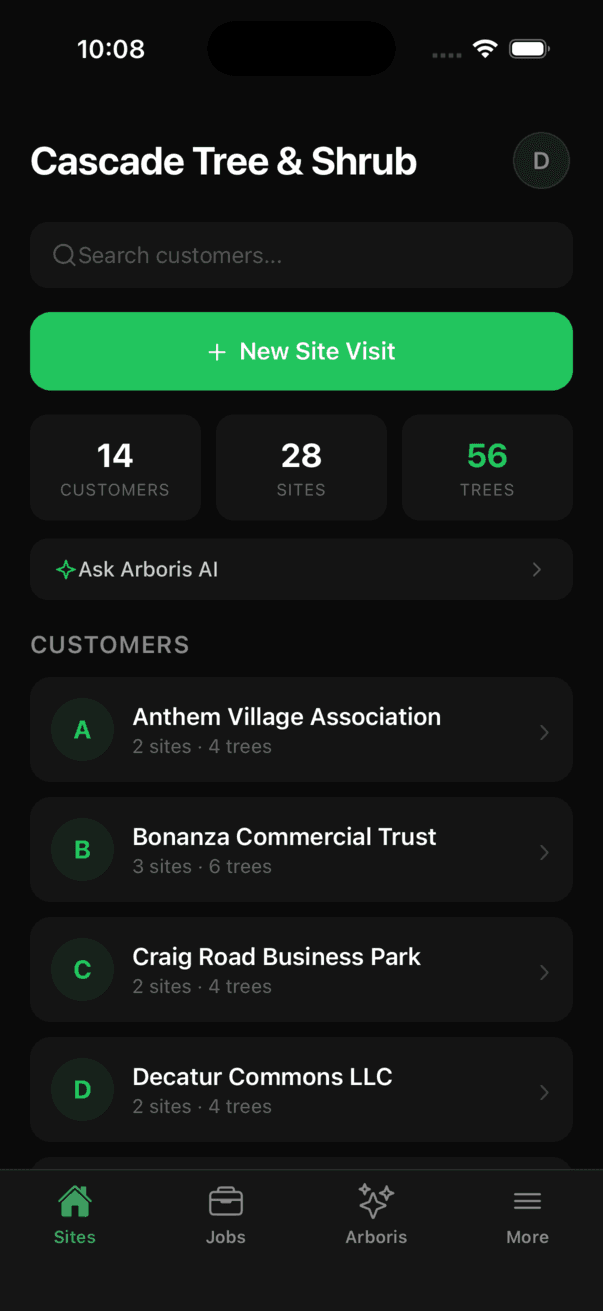
The bottom bar is Sites, Jobs, Arboris, and More. It was rebuilt so every label sits directly under its icon on every phone. Crew members get a different three tab bar, as covered above.
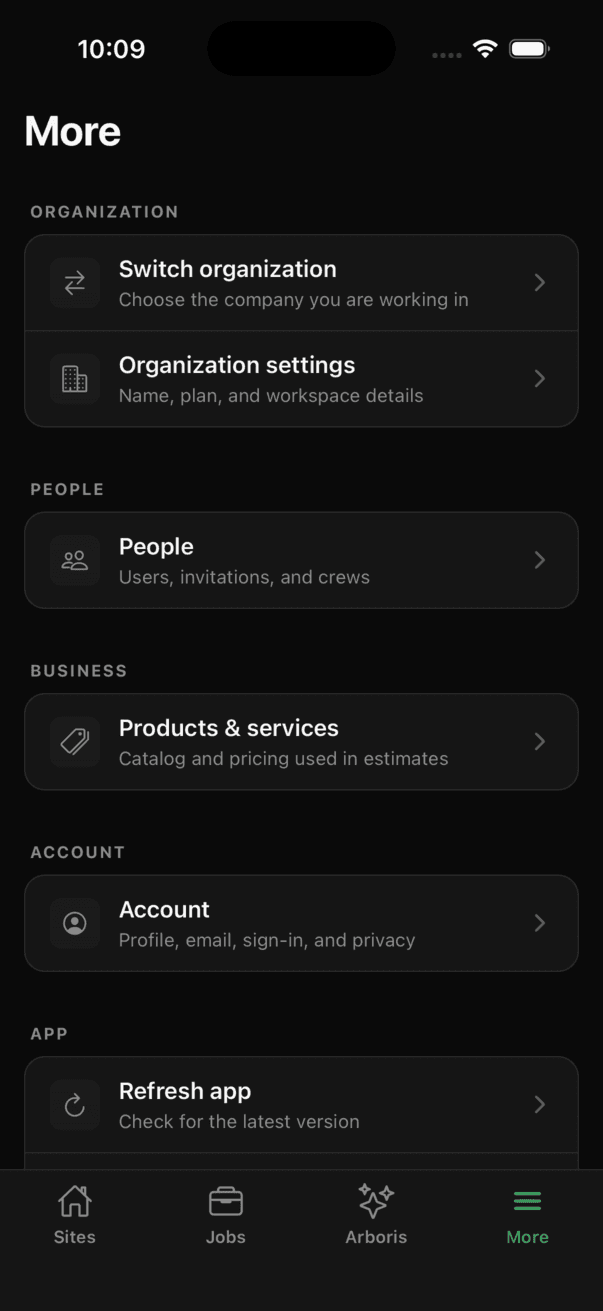
More is now grouped:
- Switch organization and Organization settings
- People, which is the hub for Users, Crews, and Crew view
- Products & services, your catalog
- Account, your own profile and sign in
- Refresh app
Your account, and your organization
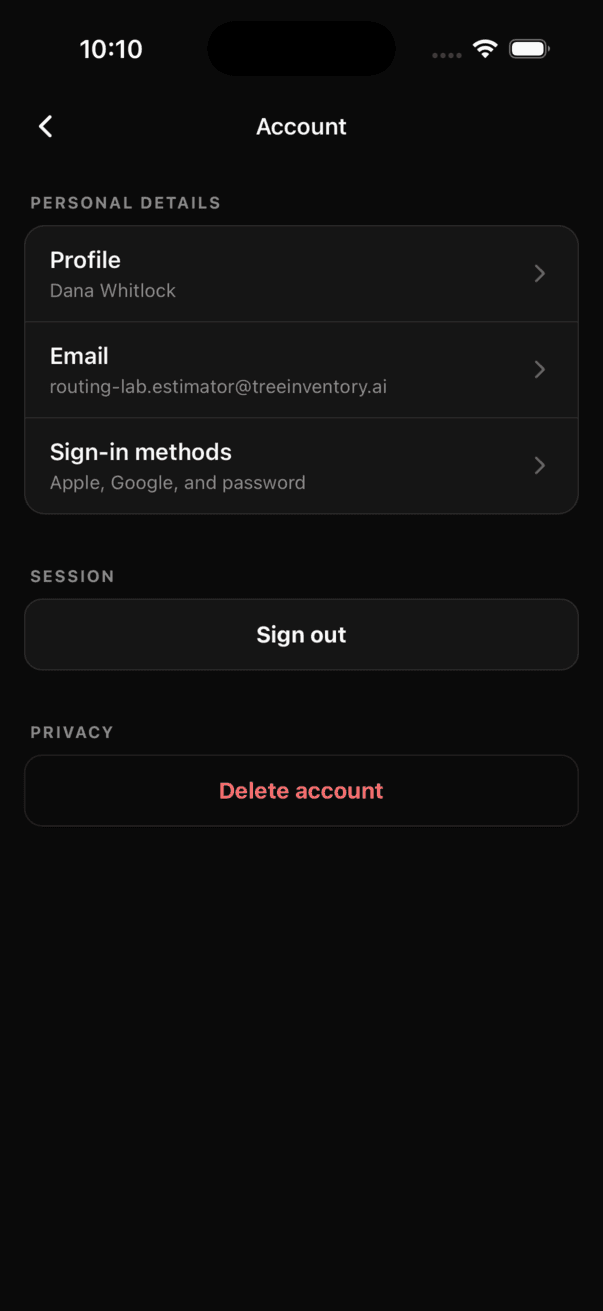
Account holds Profile, Email, and Sign-in methods, plus Sign out and Delete account. Deleting lists exactly what gets destroyed and makes you hold the button for two seconds. If you are still in a shared organization it refuses and names them.
Organization settings holds your Organization name and Website, which appears on customer facing documents, and shows your Plan. The Routing row under Operations is the automatic route ordering feature that is not switched on yet. See the note in the scheduling section.
Getting the newest version yourself
- Tap More.
- Under App, tap Refresh app.
- It checks, downloads, and restarts onto the newest version. If there is nothing new it says You are up to date. If it cannot reach the internet it says Could not refresh.
Without this, updates only landed on a cold restart, which can take days in the field. The version footer at the very bottom of More is the truth about which build you are on. Read it to whoever is helping you.
Color means something now
Decorative emoji came out of the job, plant, and site screens. Green now means one of two things: an action you can take, or a confirmed state. Clocking, check offs, progress, completion. High hazard stays red. Plant measurements fit in one compact strip instead of sprawling.
Honest
What is coming next
Nothing here works today. It is listed so you know what is being built and what is not.
- Automatic route ordering. The controls are already in the app, as covered above. Turning it on means the day gets ordered for drive time instead of by the order you scheduled it. Until then the saved schedule order is what you get.
- Dollars on top of hours. Time tracking records hours today. Labor rates, and what a job actually cost against what it sold for, come after.
- Photos from the crew. The crew can see notes and photos but cannot add them. The person standing at the finished tree is the obvious one to take the after photo, so this is high on the list.
- Telling the crew something changed. There are no push notifications yet, so mid day changes rely on somebody opening the app. This is a known sharp edge.
No dates are being promised on any of these. If one of them matters more than the others for how you actually run jobs, say so and it moves up.
Looking for the running list of smaller changes? Read the changelog.